
- Modifying your email integration
- Configuration for the Twikey SMTP-server
- Activating the mail integration using Tw...
- Configuration for a custom SMTP-server
- Validation Check
Before you can send emails, you need to configure the integration using a custom From-address. To configure your own mailaddress in the email integration, we offer up to two different approaches based on your needs. However the DKIM configuration is strongly advices for both approaches to strengthen the security and reliability of your email communications and improve deliverability, making it a valuable addition to your email infrastructure.
Modifying your email integration
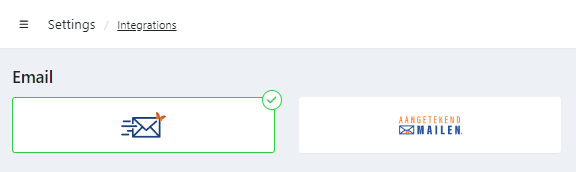
To modify your email integration, navigate to Settings > Integrations. Once you reach the integrations overview, select the Email integration to begin editing your current configuration.
Configuration for the Twikey SMTP-server
If you are uncertain about specific configuration settings please contact your IT department or IT specialist to assist you in this process.
To set up your SMTP integration and use our internal SMTP server, configure the SPF & DKIM records and follow these steps:
SPF
SPF, otherwise known as "Sender Policy Framework", is an email authentication method designed to detect forging sender addresses during the delivery of the email. To get a full benefit from SPF, you will need to set up DMARC but that will not be covered here as it is not required to complete your SMTP integration setup.
How to set up
SPF is pretty straight forward to setup and only requires a slight modification to your DNS records. If you already have an SPF record, you should only need to add the following include statement: include:_spf.twikey.com. If you need to create a new SPF TXT record, you can look at the example below, this presumes my domain is example.com.
| NAME | TYPE | VALUE |
|---|---|---|
| example.com. | TXT | "v=spf1 include:_spf.twikey.com ~all" |
More advanced set-up
In scenarios where the include:_spf.twikey.com directive results in an excessive number of DNS lookups, the following alternatives can be employed to optimize SPF configuration:
- Utilize the
amechanism withmail.twikey.com:
This mechanism specifies that if the IP address ofmail.twikey.comis used to send email, it should be considered authorized. Usingmail.twikey.comas anamechanism provides flexibility, as the SPF record dynamically adjusts to changes in the IP address associated withmail.twikey.com. This ensures that your SPF policy remains effective without requiring manual updates whenever the underlying IP address changes.
| NAME | TYPE | VALUE |
|---|---|---|
| example.com. | TXT | "v=spf1 a:mail.twikey.com ~all" |
- Include the specific IPv4 address:
ip4:52.29.184.146
This mechanism authorizes our mail server's static IP address (52.29.184.146) for sending email on behalf of your domain. Please note that this IP address is static but may change occasionally. Using ip4 allows precise control over which IP addresses are authorized to send email for your domain.
| NAME | TYPE | VALUE |
|---|---|---|
| example.com. | TXT | "v=spf1 ip4:52.29.184.146 ~all" |
DKIM (recommended)
DKIM, otherwise known as "DomainKeys Identified Mail", adds a digital signature to every outgoing message. This allows receiving servers to verify the mail actually came from your organization. This will also help reduce the number of messages that end up in spam, as the receiving server can verify the authenticity of the message.
For using DKIM in the Twikey application you should set up two DKIM selectors:
- selector
app, for the use in the live environment - selector
test, for the use in the beta environment
How to set up
To set up the DKIM records, you must add the following DNS records to the domain you wish to use in your FROM field. For example, if I would like to use info@example.com as my email address, I would need to add the following DNS records.
| NAME | TYPE | VALUE |
|---|---|---|
| app._domainkey.example.com. | CNAME | app._domainkey.twikey.com. |
| test._domainkey.example.com. | CNAME | test._domainkey.twikey.com. |
Activating the mail integration using Twikey SMTP-server
1. Enter the desired FROM address
After configuring the SPF, you can select the address you want to display as the sender of the email.
More information about the format can be found further in this article, see Full SMTP email address.
Fill in the required address in the From field.
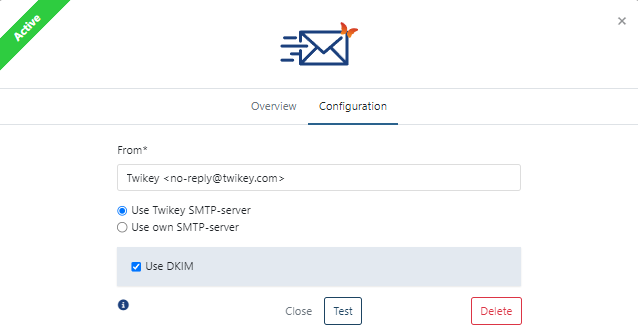
2. Enable DKIM (recommended)
If the DKIM is configured in your DNS settings, click the checkbox to activate the DKIM.
3. Test your configuration
Before saving your configuration, you must conduct a test of the integration settings. If everything works as expected, you will receive a confirmation that the tests passed succesfully.
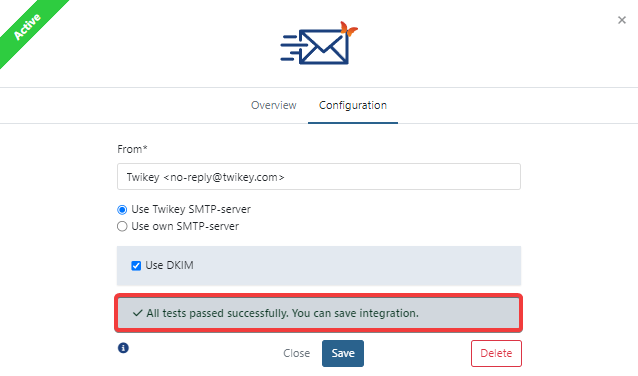
4. Save your configuration
Click on save and your configuration will be saved. The configured e-mail will be used whenever an email needs to be sent.
Configuration for a custom SMTP-server
1. Enter the desired FROM address
Here, you can select the address you want to display as the sender of the email.
More information about the format can be found further in this article, see Full SMTP email address.
Fill in the required address in the From field.
2. Enter the SMTP connection credentials
To complete the setup of your custom SMTP integration, fill in the fields as indicated below.
| Field | Required | Default Value | Description |
|---|---|---|---|
| Host | YES | <empty> | The FQDN hostname or IP of the external SMTP server |
| Port | NO | 25 or 587 (SSL) | The port on which the SMTP server listens for requests |
| SSL Enabled | NO | false | Enables transport level encryption when sending a mail to the SMTP server |
| User | NO | <empty> | The username used for when the SMTP server requests authentication |
| Password | NO | <empty> | The password used for when the SMTP server request password based authentication |
3. Enable DKIM (optional)
If the DKIM is configured in your DNS settings, click the checkbox to activate the DKIM.
4. Test your configuration
Before saving your configuration, you must conduct a test of the integration settings. If everything works as expected, you will receive a confirmation that the tests passed succesfully.
5. Save your configuration
Your configuration has been saved and will be used whenever an email needs to be sent.
Full SMTP email address
When choosing the FROM address for your SMTP integration, you can use the SMTP email address format. This means you can use of a recognizable name when sending out your emails. For example, if you want to send out a mail as info@twikey.com, the recipient would typically see info@twikey.com in their mailbox.
However, if you prefer the recipient to see Twikey [INFO] instead of solely the email address, you can achieve this by adding a common, recognizable name to the email address. To realize this scenario, you need to input the following text: Twikey [INFO] <info@twikey.com>.
The email address info@twikey.com is enclosed within < and > symbols, distinguishing the beginning and end of the address. Any text preceding the email address will be considered the common name, enabling you to specify your preferred name.
External integrations
The following integrations are possible when configuring a custom SMTP server.
- Combell
host=smtp-auth.mailprotect.bessl=trueport=587
- SendGrid
host=smtp.sendgrid.netssl=trueport=587
Validation Check
Verify DKIM-record
You can check the validity of your records by visiting mxtoolbox.com and testing both DKIM Selectors (app and test) for the domain you are configuring. If both selectors return a successful response, you are set to use DKIM for your SMTP configuration.
Verify SPF-record
You can check the validity of your SPF record by visiting mxtoolbox.com and testing the SPF record.
Enter the domain you want to test in the Domain Name field. You can even enter the IP of Twikey if you wish to run a validation test for the found SPF record.