
Setting up a failure management scheme - dunning workflow
General information
By setting up a dunning workflow, you can define which action should be taken automatically when the collection of a transaction fails. This way you don't have to follow up all your failed transactions manually.
To set up a failure management scheme, take the following steps:
- Go to Settings > Profiles and select the profile for which you want to set up a dunning workflow.
- Go to the Payments tab.
- In the section Failed payments, you can define the actions to be taken for three major types of transaction failures:
- Insufficient funds (soft failure): transactions that failed because of insufficient funds on the debtor's bank account.
- Customer refuses (hard failure): transactions that are refused by the customer.
- Failure at bank (technical failure): transactions that failed because of other issues.
In the List of Direct Debit error codes you can see the error codes listed per type of failure: soft, hard and technical.
Add a new action
To define a specific action:
- Click on

- Select the Action in the dropdown list
Actions
Try again
Submit the transaction for collection again.
- If you define a delay, the system will only try to collect the transaction again after the chosen number of days.
- If you check At the beginning of next month the system will try again the first day of next month (E.g.: 01/10).
- If you combine a delay and check At the beginning of next month the payment will be offerd for collection the next month + days delayed (E.g.: 05/10).
Allow payment alternative
This action has a set of customizations, you can opt to send a notification via email, email and SMS or only via SMS.
Email:
- Reminder with payment link: Send an email containing a payment link that the customer can use to directly pay the due amount.
- Reminder only via sms: Send only a notification via SMS containing a payment link that the customer can use to directly pay the due amount.
- Payment failure with transfer info: Send a notification via email with information to do a wire transfer. The email can be found under Emails tab -> Transactions -> Payment failure w/ transfer
Choose reminder:
Select one of the 4 different emails to be sent for this dunning workflow.
You can view and edit the emails under the Emails tab -> Transactions -> Payment failure w/link (1-4)
Grace period:
The grace period (14 days by default) is the period in days your customer can use the payment link (expiry). If the payment link is not paid after the grace period, the transaction will be moved to Unsettled or the next dunning steps is triggered if there is one.
Admin charges:
Add additional charges, these charges only apply to the payment link (or mentioned in the transfer info). The transaction itself is not increased with this amount.
Adding admin charges in different steps will take into account previous charges and increase the total amount of the payment link.
Sms messages:
When you selected 'Reminder only via sms' or selected 'Send also by sms' you have additional options:
- Delay sms with: Select a number of days to delay sending the SMS to the customer.
- A new task (Dunning reminder via sms) is added on the mandate which you can execute and/or remove manually if necessary.
- SMS: Select one of the 4 sms messages to send for this dunning workflow. You can view and edit the message under the Sms tab -> Failed payment with link (1-4).
- Only possible when you selected to send only via sms under 'Email'. Otherwise, the same reminder (1-4) is used as the one you selected under 'Choose reminder'.
Send registered mail:
To send the selected failed payment message securely and with proof of delivery.
- You receive a copy and status updates about the mail (delivered, accepted, ..)
- Requires a registered mail integration, contact your Business Support Agent for more information.
Change status of mandate
Change the status of the mandate to cancelled or suspended.
- Choose whether you want to Suspend or Cancel the document.
- Choose whether you want to exclude account for future mandates
- The bank account can't be used to sign new mandates.
- The bank account can only be unblocked via our REST API
- Premium package required
The next step in the dunning workflow is directly executed after this one.
Notify
Send a notification that the payment failed. The email can be edited under the Emails tab -> Transactions -> Notify (Payment failure).
If there is a next dunning action configured, it is directly executed after the notification.
Send official letter (Wik Letter)
Send a personalized letter
- Grace period: Day(s) the customer has to pay the due amount.
- Admin charges: Add administrative charges to the transaction
- Use payment link: Create a payment link
- Send registered email: Send the additional Wik email via your registered mail integration.
- Send also by sms: Send additional sms defined under the SMS tab Failed payment #1.
- Delay sms with: Sends the sms only after the selected number of days (value must be less than the grace period).
- Keep the actual document: A copy of the letter is stored on the document within Twikey.
- Additional charges may apply, contact your Business Support Agent for more information.
- If an email is to be sent out, the pdf will always be included.
- For more information about the full configuration of the letter contact your Business Support Agent.
- Notification: The Wik email is always sent to the end-customer.
You can customize or disable the email via the Emails tab -> Transactions -> Wik.
Offer signing an alternative mandate
Send an email to the customer to sign a new mandate.
- Edit the email under the Emails tab -> Transactions -> Alternative profile
Move mandate to other profile
Change the profile of the current mandate to another profile of the same type (CORE, B2B, ..)
If you defined variables on the current profile, the target profile requires the same attributes. You can clone the current profile to directly copy all the attributes to the new one.
Notifications to your customer
Each step has the option to select if you want to notify the customer and if you want to also receive the notification.
For some steps the option to notify the customer is always enabled.
To disable specific notifications edit and disable the email under the Emails tab and uncheck the 'customer'.
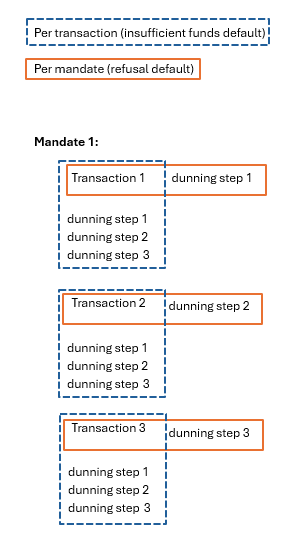
Choosing your failure management strategy
If you've only specified a single action for each type of failure (such as insufficient funds, customer refusals, and bank failures), having a failure management strategy might offer limited utility. However, if you've specified multiple actions for each type, a defined strategy assists in determining whether the steps should apply to a single individual transaction or to all transactions associated with a document.
There are three possible strategies:
- Per transaction: The steps will apply to each transaction individually. For each transaction on a mandate, the step count will start with step 1.
- Per mandate: Therefore, if multiple transactions exist for a single document, the first failure will trigger step 1, the second failure will trigger step 2, and so forth.
- Default: Per transaction for insufficient funds and per document for refusals. We suggest using this option because it matches how people usually handle their invoices. If someone consciously refuses a collection once, they're likely to continue refusing. Similarly, if there's insufficient funds in the account, retrying the transaction later makes sense.
After you've defined and saved your actions and strategy, don't forget to click the Save button on the bottom of your screen.