
Attributes settings
- The attributes screen
- Adding an attribute to your profile
- Maximum Amount as an attribute for eMach...
- Message on transaction in case of signin...
Show me
In addition to the standard fields provided in an invite to a customer, it is possible to add custom fields. These additional fields are added to the profile used for the invite. We call these fields attributes.
Attributes offer a powerful way to enrich customer profiles with additional information tailored to your organization’s needs.
Whether it's internal references, customer segmentation, specific product preferences, or customized workflows. Attributes allow you to flexibly add extra data fields and making reportings more customized.
The attributes screen
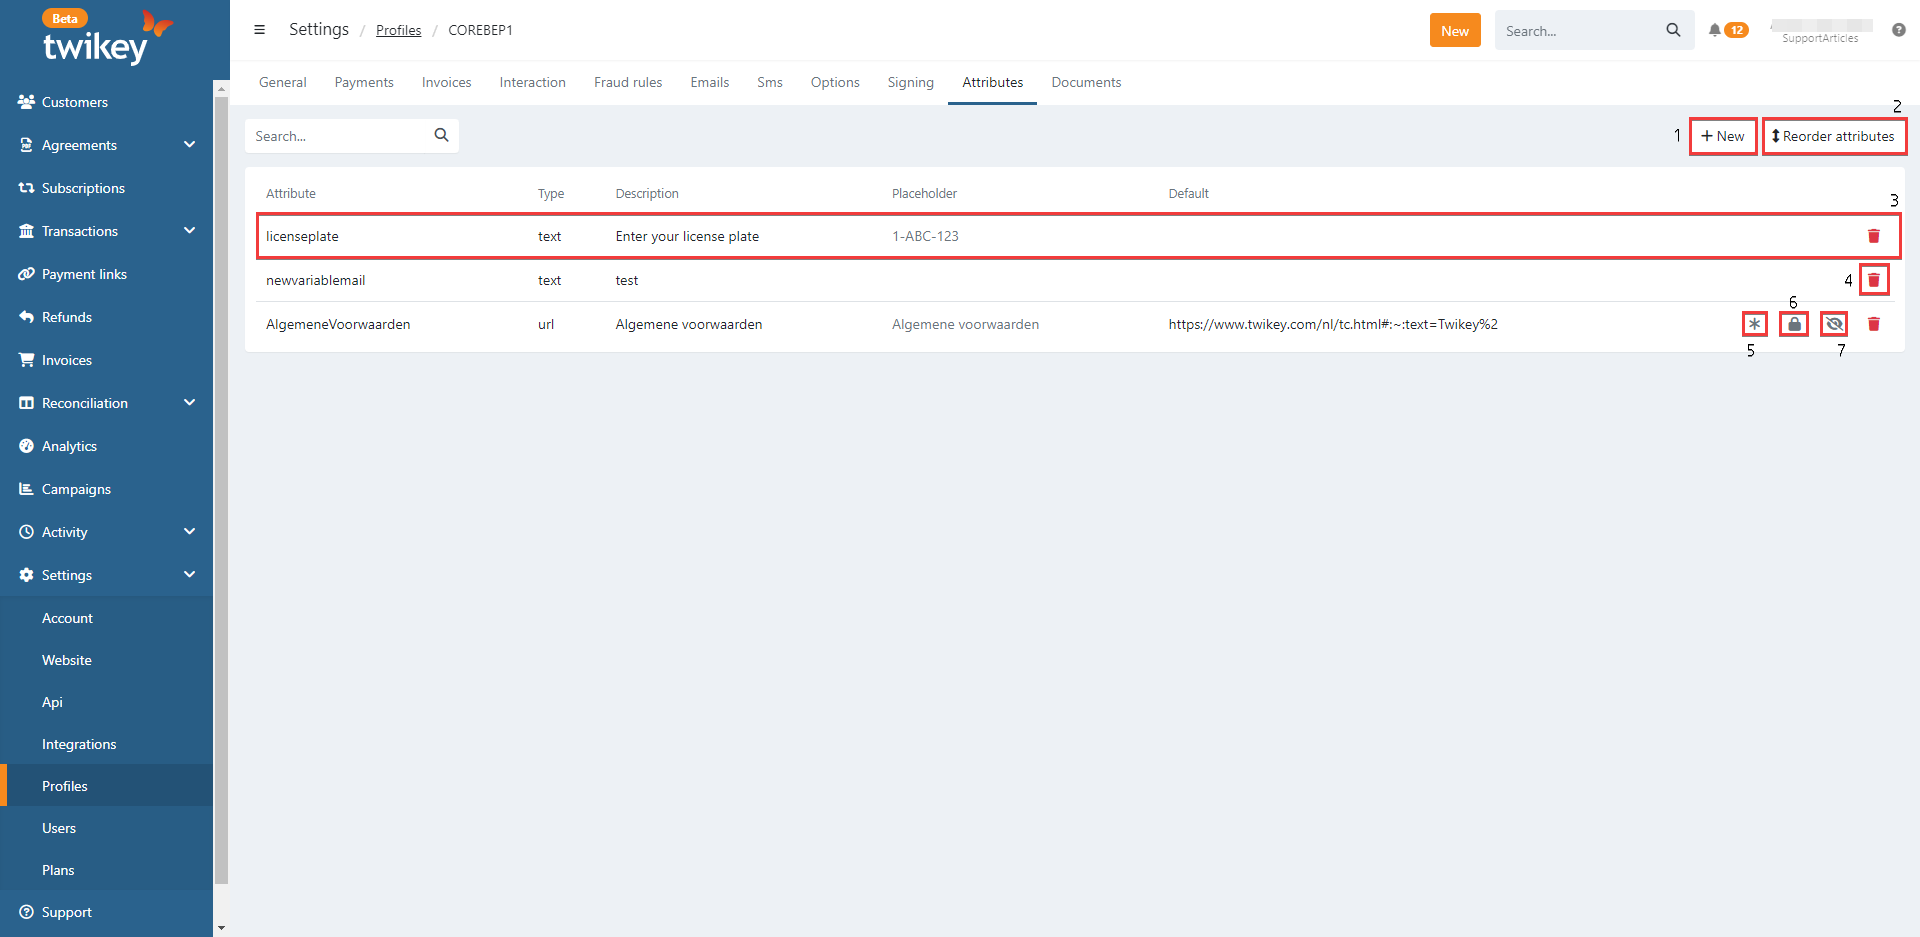
It is possible to perform the following actions on this screen:
- Add an attribute (1)
- Change the order of the attributes (2)
- Click the attribute to edit (3)
- Delete an attribute (4)
- Indication the attribute is mandatory (5) (set in edit pop-up screen)
- Indication the attribute is read-only (6) (set in edit pop-up screen)
- Indication the attribute is hidden (7) (set in edit pop-up screen)
The attributes will be displayed on the document in the same order as in the profile. To change the order, click on button (2) the Attributes screen, the attribute will be moved up or down according to your actions. Then click Save.
Adding an attribute to your profile
To add attributes to a profile, you can proceed as follows:
- Go to Settings > Profiles and select the profile to which you want to add an attribute.
- Go to the Attributes tab.
- Click on Add to create a new attribute. The additional fields screen is opened.
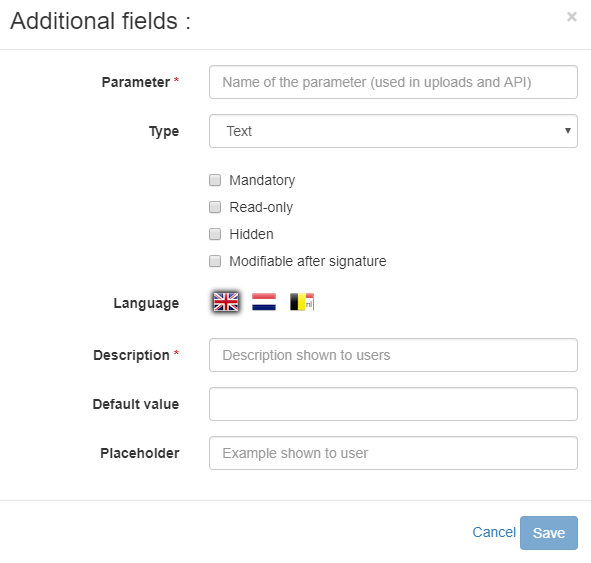
- Fill in the following data:
- Attribute: the name of the attribute. This name can only consist of one single word, is case sensitive, and may not contain dots (.) or other special characters.
- Type: the kind of attribute you want to create. Choose between
- Text: to enter text.
- Number: to enter a number.
- Amount: to add a collection amount to the mandate. If you want the amount to be charged the moment the mandate is signed, the parameter for this type has to be amount (lowercase). In this case, the customer will get the message that he is signing a mandate with a payment of € xx. If you give this parameter another name, a separate transaction will be created after the mandate is signed. This transaction still has to be prepared and sent to the bank.
- Select: to allow your customer to choose between a set of options. In this case, the field Placeholder will change to Options. Use this field to define the options (add another value by clicking the plus sign). The customer will get to see a dropdown list from which he can select the relevant value.
- Plan: to add a plan to the mandate, this can be a default or custom plan. Contact our support for more information.
- Multi-value: to allow your customer to enter multiple values.
- Email: to enter an email address.
- Url: to enter an URL.
- True/false: to add a checkbox with a message. If the box is checked, the status is considered to be true. If the box is not checked, the status is considered to be false.
- Iban: to allow the customer to add an extra bank account.
- Description: the description of the attribute.
- Placeholder: the text entered here is an example of a valid answer. This gives your customer an idea which information needs to be filled in.
- Default value: enter a default value for the attribute. If the user fails to enter anything, this value will be used.
- Check the boxes that apply:
- Mandatory: the attribute has to be filled in by the debtor to continue with the signing process.
- Read-only: the customer will be able to see the attribute while he is signing, but not modify it.
- Hidden: the customer will not be able to see the attribute while he is signing, only on the preview and the signed document PDF.
- Modifiable after signature: the attribute can be edited by the customer after signing the mandate.
- Click on Save to save the attribute.
All the attributes you have created, except those that are Hidden, will be displayed during the signing process.
Never check both 'Mandatory' and 'Hidden' simultaneously. Doing so will result in an error message for your debtor, who won't be able to see the attribute and, as a result, won't be able to sign your document.
Maximum Amount as an attribute for eMachtigingen
For eMachtigingen, it is possible to get the maximum amount as an attribute. If you do this, the customer can see this attribute on his PDF and you can see it in the document information screen. To do this, you can define the attribute as follows:
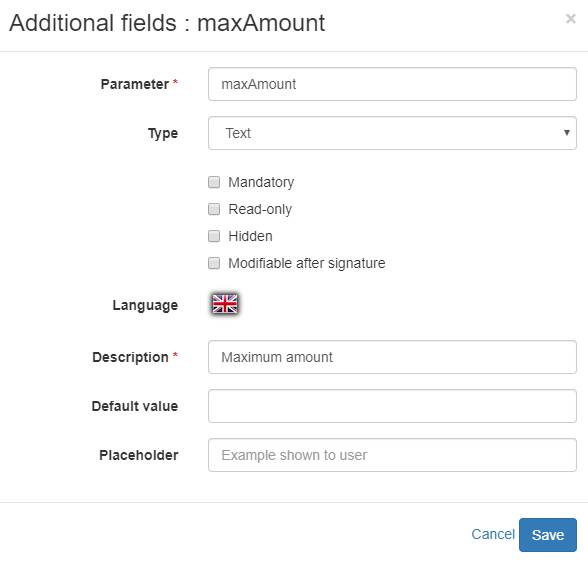
For more information about eMachtigingen, see eMachtigingen.
Message on transaction in case of signing mandate with 1st payment.
In some case you might want to invite your customer to sign a mandate with a first payment. In this case you also might want to have a (structured) message for reconciliation purposes later on.
To do this, you should add the attribute "_txd" so you can add the desired (structured) message upon creating the invite.