
Exact Online
- General information
- Configuring your Exact Online environmen...
- Importing your customer database in Twik...
- Export mandates from Twikey to import in...
- Export mandates from Exact Online to imp...
- Use Your Own Payment Reference
- Importing sales invoices in Twikey
- Credit notes
- Reconcile payments
General information
As a customer of Exact Online, you can find a specific import function in Twikey to upload your invoices and get them paid through a Direct Debit, a payment link or even a regular transfer.
For more information about managing your invoices, see Managing your invoices.
You can download the Exact integration manual here
Configuring your Exact Online environment
Twikey: No specific setup is needed in Twikey.
Exact Online: The activation of UBL2.0 is mandatory!
- Click on your company name in the top left corner and choose ‘Settings’
- Go to tab ‘Sales Invoice’
- Go to attachment: Types and select UBL 2.0
- Press OK and save
The UBL activation is not retroactive.
Importing your customer database in Twikey (for a Direct Debit conversion campaign)
Importing your customer database into Twikey can be useful for initiating a conversion campaign from within Twikey. Customers can be imported in several ways, either through sales invoice import or via an export file. When the import is complete, we'll show you the number of customers imported and send you a confirmation email.
Through the import of sales invoices
When you import invoices the customer is automatically created/updated.
Through an export file
- Log into your Exact Online account
- Click on the name of your company on the top left and select Import/Export and choose XML
- Scroll down to Accounts and choose Export and export again.
- Import the XML file in Twikey via the button and choose Import
- Select type: Customers and file type: Exact Online
When the import is done, we show you how many customers we have imported and we send you a mail.
Export mandates from Twikey to import in Exact Online
Step 1 - Export the mandates from Twikey
- Go to the menu Agreements and select the mandates you want to export
- Click the Export button in the top right of your screen and select Exact Online from the dropdown list.
- Click Export, a
.csvfile is created to import in Exact Online
Step 2 - Import the mandates in Exact Online
- Click on the name of your company on the top left and select Import/ Export and choose CSV/Excel
- Go to Mandates and choose Import
- Choose Comma separated values (CSV) option
- Upload the Twikey file and click Next
- Choose Yes when asked if the header is included in the file and click Next
- You will see a quick overview of headers, this should be correctly mapped, click Next
- Change the following field formats
- MandateCancellationDate to
Year Month Day - MandateSignatureDate to
Year Month Day - MandateFirstCollection to
True/False
- MandateCancellationDate to
- Click Next when you have changed the field formats
- If mandates with existing references already exist, you will get the option to exclude them, click Next
- You will see an overview of the New, Updated, and Errored mandates
- Click Finish if you wish to complete the import
- You can view your mandates by navigating to Financial, go to Banking & Cash, go to Mandates.
Export mandates from Exact Online to import in Twikey
Step 1 - Export the mandates from Exact Online
- Click on the name of your company on the top left and select Import/Export and choose XML
- Go to ‘Mandates’ and choose Export
- Click 'Export' and 'Next' in the prompt that opened to export the file.
Step 2 – Import the mandates in Twikey
- Go to the button and choose Import
- Select Type: Agreements and file type: Exact Online and choose the desired Profile
- Select your document and import your file(s) or drag them in the box.
When the import is done, we show you how many agreements we have imported and we send you a mail.
Use Your Own Payment Reference
You can use your proper payment reference for an invoice.
To use this feature, the field 'Payment reference' has to be enabled in Exact Online.
- Go to Sales and then to Invoices
- Select 'Create'
- Click on the settings and 'Customize'(1)
- Enable the option 'Payment reference' (2) and Save.
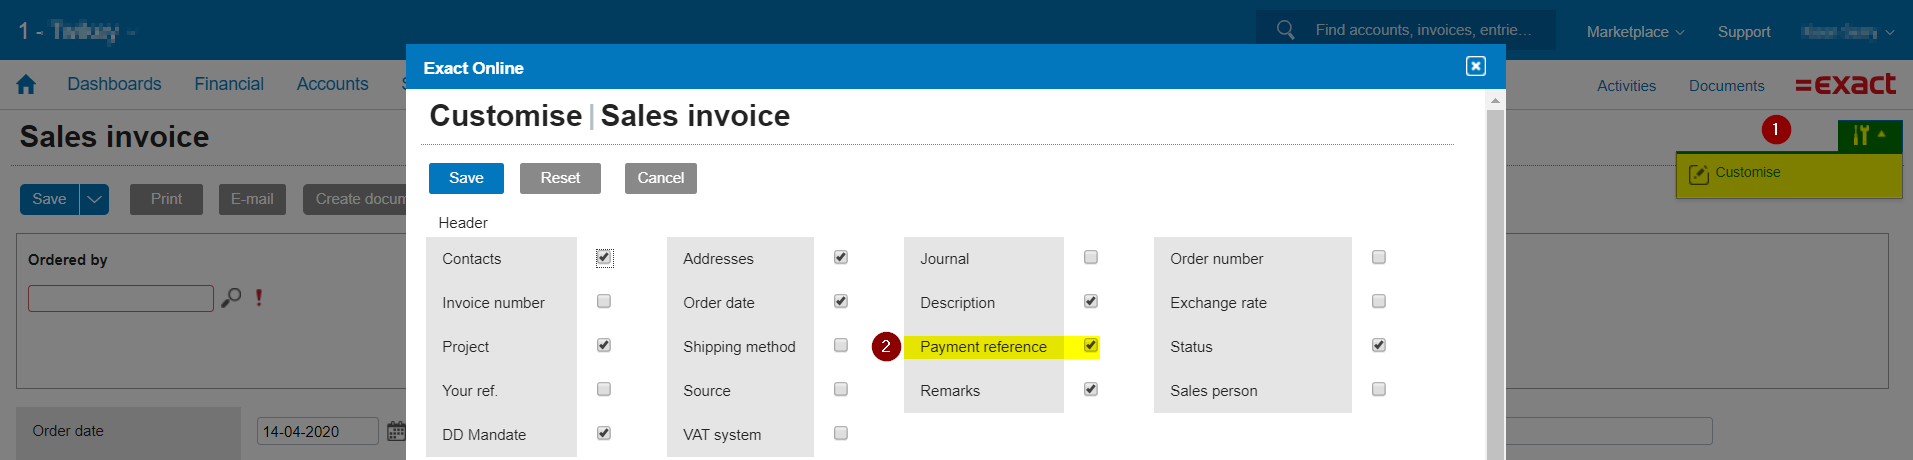
- When creating an invoice fill in the field 'Payment reference' (3)

Importing sales invoices in Twikey
If you already have active mandates in Exact Online, we strongly suggest to import the mandates in Twikey.
That way, the mandate will be used when the sales invoice is imported in Twikey.
IMPORTANT
- To be able to import invoices in your Twikey environment you need the sales invoice AND the corresponding document.
- To create a sales invoice in Exact Online, please contact their support or click here
- To create the corresponding document in Exact Online, please contact their support or click here
Step 1 - Export the sales invoice from Exact Online
- Click on the name of your company on the top left and select Import/Export and choose XML
- Go to Sales invoices and click Export
- On the XML > Export screen you can now select to export a set of invoices or credit notes from a specific journal, or only export an individual invoice using a specific order or invoice number. The following checkboxes need to be checked:
- Type: choose your type = Invoice
- IMPORTANT Including documents is mandatory: Always select the box, because a document is necessary to be able to import in Twikey
- Only modified data since last export: To avoid exporting duplicated items you can opt to check the option in order to only export new data.
- Click 'Export' and 'Next' in the prompt that opened to export the file.
Step 2 - Import the sales invoice in Twikey
- Go to the button and choose Import
- Select type: Invoices and file type: Exact Online and choose the desired Profile
or
- Go to the Invoices menu and choose Import
- Select Type: Exact Online and choose the desired Profile
- Click on select your document and import your file(s) of drag them in the box.
When the import is done we inform you about the state of the imported invoices on your screen and we inform you also by mail.
The invoices are imported including their PDF.
Please note that previously imported invoices cannot be imported again.
Reconcile payments
We offer MT940 and CODA (for Belgium) reconciliation files compatible with different bookkeeping software.
Our reconciliation files contain a suspense account that needs to be added in Exact Online.
- Go to Reconciliation and choose Files
- Choose Generate in the top right corner and select
- For Belgium: CODA - Transactions for direct debit and payment links for psp payments
- For the Netherlands: MT940 (Beta) - Transactions for direct debit and payment links for psp payments as format and generate the file.
- Download the generated file
- In Exact Online go to the menu Financial - Banking & Cash – Statements
- Import
- Select the required bank account (not the reconciliation account) and import the file.
Once the file is imported, depending on your configuration, the matching of the payments to your invoices is done automatically.