
General Configurations of a Profile
- Overview
- 1. Profile ID
- 2. Languages Used on this Profile
- 3. Profile Name
- 4. Profile Type
- 5. Creditor-ID
- 6. Prefix
- 7. Recurring Payments
- 8. One-Off Payments
- 9. Currency
- 10. Agent
- 11. Contract Reference
- 12. State
- 13. Valid From (Start of the Validity Pe...
- 14. Valid Until (End of the Validity Per...
- 15. The Save & Cancel Buttons
- 16. The Delete Profile Button
Overview
The General section allows you to set up/edit the key configuration settings of a profile. In this webpage, we will explain to you about all of the configuration settings that are displayed on the General section. You can click on the image below to enlarge it.
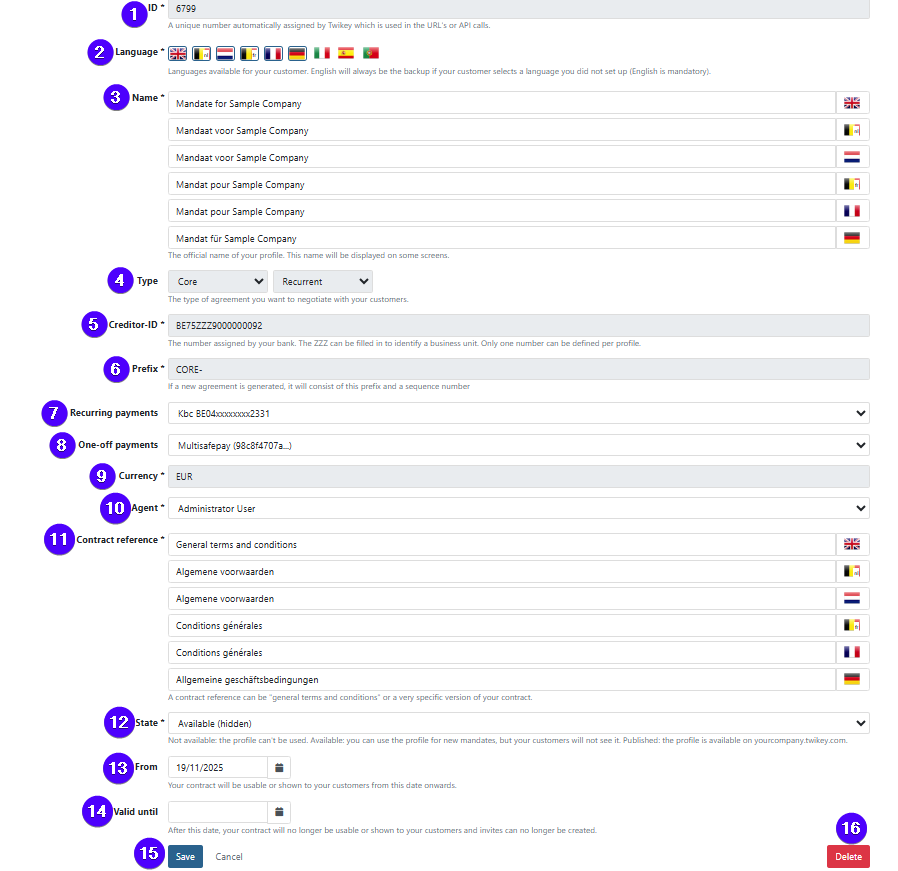
After performing any edit, you'll need to click on Save. Or if you prefer to cancel your edits, then you can click on Cancel. You can find these two buttons at the very bottom of the interface (please refer to No. 15 on the image above).
1. Profile ID

In this configuration option, you can see this profile's ID. A profile ID is a unique number that's automatically assigned by Twikey and is used in URL's and API calls. A profile ID can't be changed.
2. Languages Used on this Profile

In this configuration option, you can see & select/deselect the languages that are used for this profile. These settings determine which languages are available when sending communication (for example: via email or SMS) to your customers.
Some languages are used across different countries but require a specific locale to ensure correct formatting and tone. For example, Dutch is used in Belgium & Netherlands, while French is used in Belgium & France.
For example:
-
nl_BE(Dutch for Belgium) -
nl_NL(Dutch for the Netherlands) -
fr_BE(French for Belgium) -
fr_FR(French for France)
Hence, make sure to enable the corresponding flags. This ensures that messages are delivered in the correct version of the language, based on the customer’s country of residence.
Fallback Scenario
When a document, transaction, payment link, invoice, or any other type of item is created, we look at both the customer's country and language to determine which flag (locale) should be used for communication.
Example:
- A customer has French as their language and France as their country.
- If French–France
fr_FRis enabled, we’ll use that for the communication. - If it's not enabled, but French–Belgium
fr_BEis, we’ll fall back to the French-Belgium version. - If neither the French_France nor the French-Belgium flags are enabled, the email will fall back to the English version.
The same fallback logic applies for Dutch and its country variants (in this case Belgium & the Netherlands) and the fallback works in both ways.
- A customer has Dutch as their language and the Netherlands as their country.
- If the Dutch–Netherlands flag
nl_NLis enabled, we’ll use that for the communication. - If it's not enabled, but Dutch–Belgium
nl_BEis, we’ll fall back to the Dutch-Belgium version. - If neither the Dutch-Belgium nor the Dutch-Belgium flags are enabled, the email will fall back to the English version.
3. Profile Name
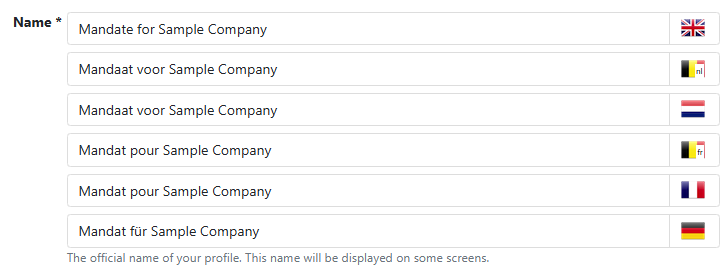
In this configuration option, you can see and edit this profile's name (in each language that was selected on the Languages Used configuration option).
4. Profile Type

In this configuration option, you can see this profile's type (e.g., CORE, B2B, Recurring Credit Card, etc.), as well as whether it facilitates recurring payments or one-time payments.
You can select a profile's type when you're creating the profile. Afterward, you can no longer change it yourself. If you wish to change it, please contact us by sending a support ticket. Click here to see how you can send a support ticket.
5. Creditor-ID

In this configuration option, you can see this profile's creditor-ID. A creditor-ID is your organization's unique ID for collecting SEPA Direct Debit payments. Normally, you get a creditor-ID from your bank.
In case your payments are done using another company (ultimate handler), then the that information is displayed instead.
You can input a profile's creditor-ID when you're creating the profile. Afterward, you can no longer change it yourself. If you wish to change it, please contact us by sending a support ticket. Click here to see how you can send a support ticket.
6. Prefix

In this configuration option, you can see this profile's prefix. A prefix is used to name an agreement when they are generated automatically. This is especially useful to identify agreements if they are generated automatically and in a large quantity, as they will all have the same prefix in their name. Click here to learn more about it.
Please avoid using any special characters when creating the prefix. We also advise you to start with a letter and not a number, as this is required for certain signing methods.
The length of a prefix is limited to 15 characters. Moreover, a prefix needs to be unique for each profile that you have on your environment.
You can input a profile's prefix when you're creating the profile. Afterward, you can no longer change it yourself. If you wish to change it, please contact us by sending a support ticket. Click here to see how you can send a support ticket.
7. Recurring Payments

In this configuration option, you can see and edit the bank account that is used for recurring payments on this profile. You can add, edit, and delete payment channels on the Payment Hub menu.
8. One-Off Payments

In this configuration option, you can see and edit the Payment Service Provider (PSP) account that is used for one-time payments on this profile. You can add, edit, and delete payment channels on the Payment Hub menu.
9. Currency

In this configuration option, you can see the currency that is used for all financial activities that falls under the umbrella of this profile. You can input a profile's currency when you're creating the profile. Afterward, you can no longer change it yourself. If you wish to change it, please contact us by sending a support ticket. Click here to see how you can send a support ticket.
10. Agent

In this configuration option, you can see and edit the agent (a user within your company) that is responsible for this profile. All agreements that fall under this profile will have his/her name listed as the agent. An agent will recieve an email whenever there's an update to the agreements where they are responsible for.
You can also manually assign an agent to a specific agreement on the agreement editing menu.
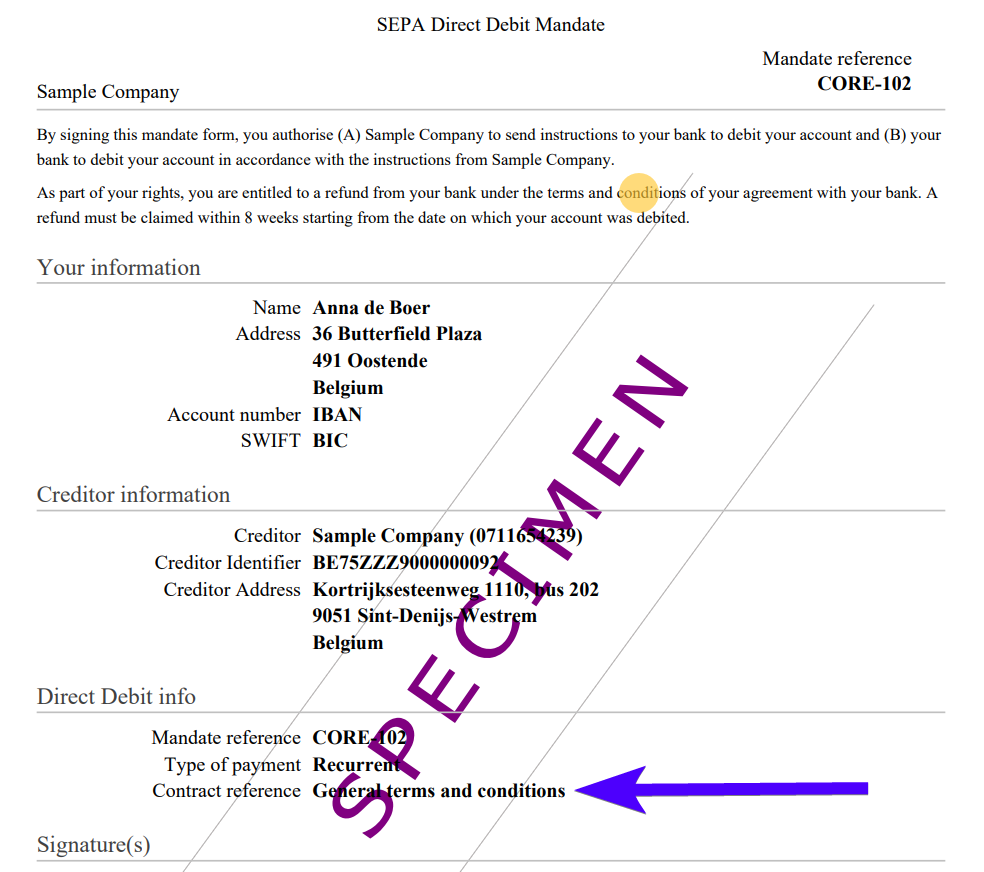
11. Contract Reference

In this configuration option, you can see and edit the contract reference of all agreements that falls under the umbrella of this profile (in all of the languages that have been enabled on the Languages Used configuration option).
A contract reference refers to the terms & conditions that apply to an agreement. A profile's contract reference is mentioned on all of the agreement documents that your client needs to sign, as shown in the screenshot below. That way, all parties know which terms & conditions apply to the agreement. This is important for legal purposes.
Nonetheless, you can still manually select the contract reference that applies to an agreement when you're creating an agreement. Be it via the Twikey interface/importing agreements/API.
You can also manually select the contract reference that applies on an agreement when you're editing an unsigned agreement. Once an agreement has been signed, the contract reference can no longer be edited.
12. State

In this configuration option, you can see and edit the state of this profile. Below, you can find an explanation of each possible state:
- Available (hidden): The profile is active and can be used.
- Published: The profile is active and can be selected from the public url.
- Not available: The profile can't be used for new agreements.
13. Valid From (Start of the Validity Period)

In this configuration option, you can see and edit the start date of this profile's validity period (and all of the agreements that fall under this profile's umbrella).
By default, a profile is valid from its creation date.
14. Valid Until (End of the Validity Period)

In this configuration option, you can see and edit the end date of this profile's validity period (and all of the agreements that fall under this profile's umbrella).
If this field is empty, then the profile will remain valid indefinitely. To empty this field, simply delete the text that exists in the field.
Please keep in mind that when a profile is not valid anymore, you are unable to create new agreements using that profile. However, you can still import invoices onto it. Please keep in mind that in this case, only one-off payment methods will work. Recurring payment methods won't work.
15. The Save & Cancel Buttons

After performing any edit, you'll need to click on Save. Or if you prefer to cancel your edits, then you can click on Cancel instead. You can find these two buttons at the very bottom of the interface.
16. The Delete Profile Button

You can delete a profile by clicking on this button. You can find this button at the very bottom of the interface.