
How to edit a customer
How to reach the customer editor menu
- Navigate to the customer details interface of the customer that you wish to edit.
- Click on Edit.

- The customer editor interface will then pop-up.
On the guide sections below, we'll explain the editing possibilities.
Customer details
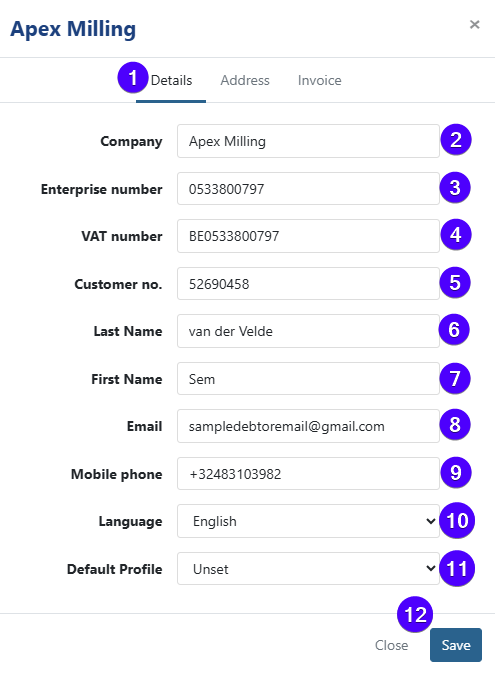
- Click to open the customer details tab. By default, this is the tab that will pop-up when you open the customer editor menu.
- You can edit the company name here. This is only applicable for company-type customers. For person-type customers, this field should be left blank. You can learn more about both types of customers here.
- You can edit the customer's enterprise number here. This is only applicable for company-type customers. For person-type customers, this field isn't shown.
- You can edit the customer's VAT number here.
- You can edit the customer's customer number here.
- You can edit the customer's last name here.
- You can edit the customer's first name here.
- You can edit the customer's e-mail address here.
- You can edit the customer's mobile phone number here.
- You can edit the customer's preferred communication language here.
- You can select the default profile that will be used for this customer here.
- To save your edits, click on Save. To cancel your edits, click on Close.
Note: For company-type customers, fields No.5 and 6 refer to the name of your contact person from that company.
Converting a person-type customer to a company-type customer (or vice versa)
It's possible to convert a person-type customer to a company-type customer (or vice versa).
To convert a person-type customer to a company-type customer, follow the steps below:
- Navigate to the customer editor menu.
- On the customer details tab, click on Convert to company.
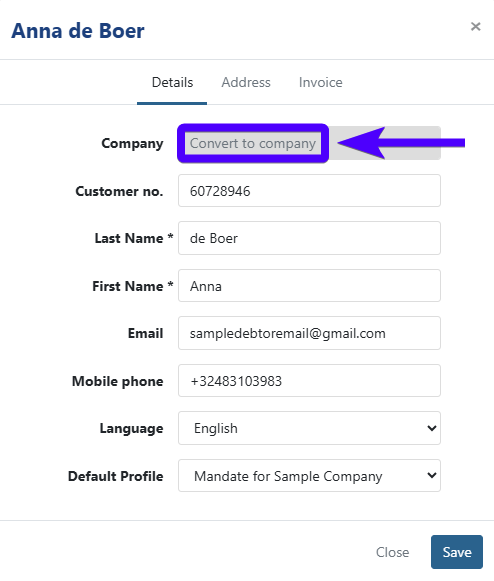
- Type in the company name on that field.
- Optionally, you can also type in the enterprise number on the Enterprise number field that just popped out underneath.
- Click on Save.
Meanwhile, to convert a company-type customer to a person-type customer, follow the steps below:
- Navigate to the customer editor menu.
- On the customer details tab, delete the company name.

- Click on Save.
Please be aware that converting a customer's type will not impact signed agreements.
For example: in one of the procedures above, we've converted a person-type customer (Anna de Boer) to a company (Eclisse Atelier). Before this conversion, Anna de Boer has already signed an agreement. In this case, even after the conversion, that particular agreement's signer is still "Anna de Boer" (and not Eclisse Atelier).
However, we do inform you whenever an agreement was signed when the customer was a different type of customer. If an agreement was signed by a company-type customer when it was still a person-type customer, then you'll see the person icon:
![]()
If an agreement was signed by a person-type customer when it was still a company-type customer, then we you'll see the building icon:
![]()
Customer address
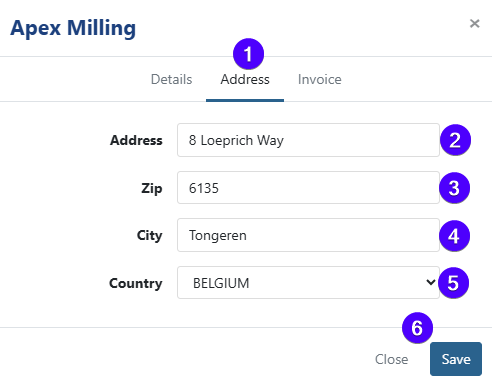
- Click to open the address tab.
- You can edit the customer's street and house/building number here.
- You can edit the customer's postcode here.
- You can edit the customer's city here.
- You can edit the customer's country here.
- To save your edits, click on Save. To cancel your edits, click on Close.
Customer invoice
These settings concern the invoices that will be sent to this customer.
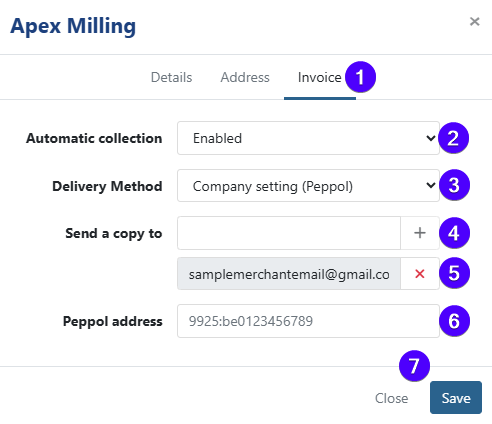
- Click to open the invoice tab.
- Automatic collection
Select whether automatic invoice collection is enabled or disabled. If it's enabled, then if the customer has a mandate on the same profile as the invoices, then these invoices will be collected automatically. If it's disabled, then these invoices are never collected automatically. - Delivery method
Select the invoice's sending/delivery method (whether via the default company settings/e-mail/paper letter/Peppol).
You can adjust your default company settings in the Invoice delivery method section of the company information settings. - Send a copy to
If you'd like to also send a copy of the invoice sent to this customer to another e-mail address, then you can fill in that e-mail address on this field and click on the plus icon. - If you'd like to remove an e-mail address that has been added here, then click on the red x mark.
- Peppol address
This address is required for Twikey to generate UBL invoices. A valid electronic address is necessary to create a Peppol-compliant UBL file. If you upload your own UBL files directly into Twikey, this field is not required. When the Peppol integration is activated, Twikey will automatically update this address. If the customer can be found on the Peppol network, the corresponding Peppol address will be displayed. You may also enter the Peppol address manually. To revert to the automatically discovered address, clear the field and click Save. Twikey will then resume using the address found in the Peppol directory, if available.
Examples :
9925:BE123456789when the VAT number is registered on the Peppol network9908:0123456789when the enterprise number is registered on the Peppol network0088:5411987002411when a GLN is registered on the Peppol network (Twikey cannot perform a lookup for this address type)
- To save your edits, click on Save. To cancel your edits, click on Close.